Applicant form settings
The applicant form is the final form your users fill out. You can create a new form or edit the default one, adding and modifying options as needed.

18.1 General
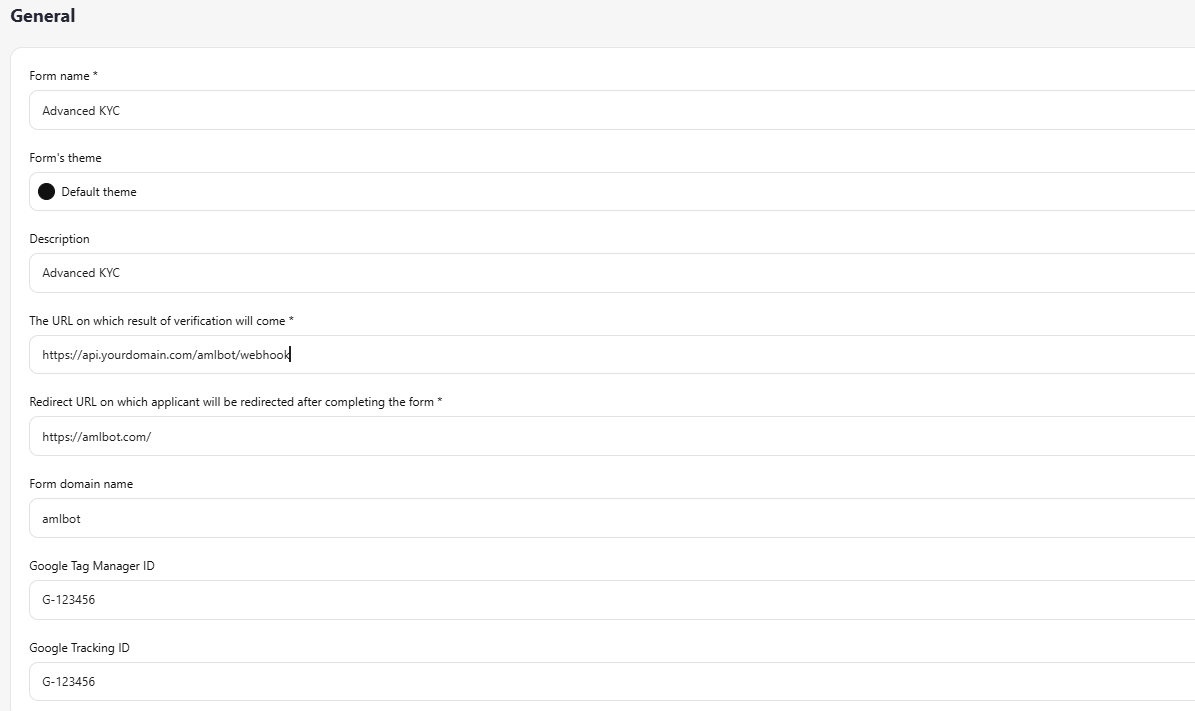
Name — set the form name.
Custom Theme (optional) — if you have a custom theme configured, select it from the list. See Theme Editor (section 7) for theme setup details.
The URL on which verification results will be sent * — specify the URL where the system will post verification results.
Redirect URL on which the applicant will be redirected after completing the form * — specify the URL where the applicant will be redirected after finishing verification.
Form Domain Name — specify the domain to be used in the verification form link. It will appear in the URL sent to applicants. Important: the domain must be pre-configured on your side. If the domain is not connected or configured incorrectly, the link will be generated but may not work.
Optional: Google Tag Manager ID — format GTM-XXXXXXX
Optional: Google Tracking ID — format G-XXXXXXXXXX
These parameters are used to enable analytics and track events on the verification form page.
18.2 Additional
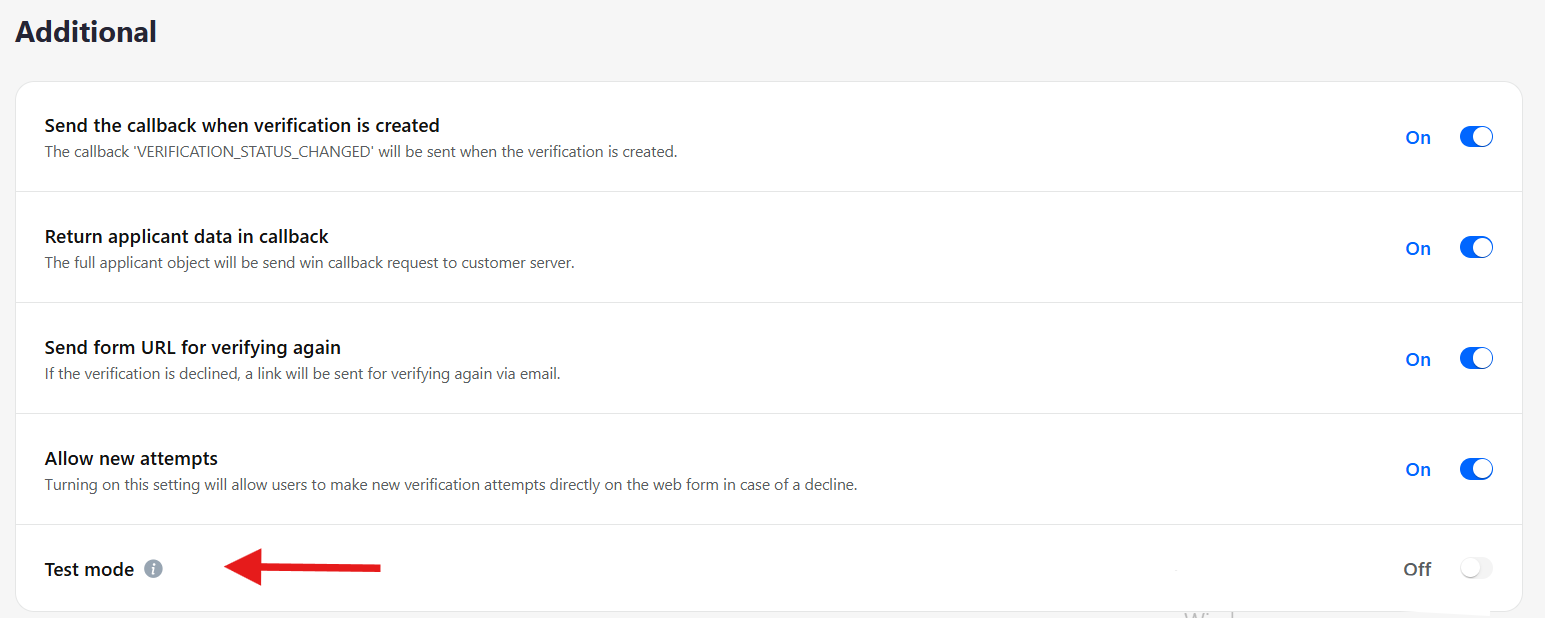
VERIFICATION_STATUS_CHANGED callback — receive status updates when verification changes.
Return applicant data in callback — the full applicant object will be sent in the callback request to your server.
Send form URL for re-verification — if verification is declined, a link will be sent via email to allow re-verification.
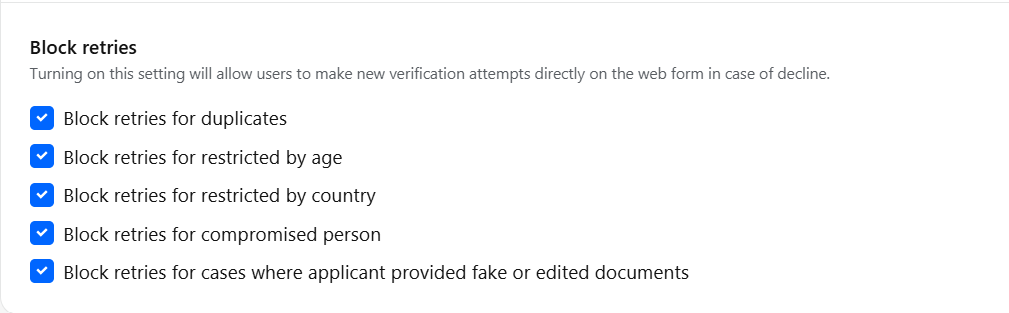
Allow new attempts — enabling this allows users to make new verification attempts directly on the web form if declined.
Test Mode — enable to switch the form into a testing environment. Verifications completed in test mode are free. Remember to disable test mode before providing the form to real users.
18.3 Languages
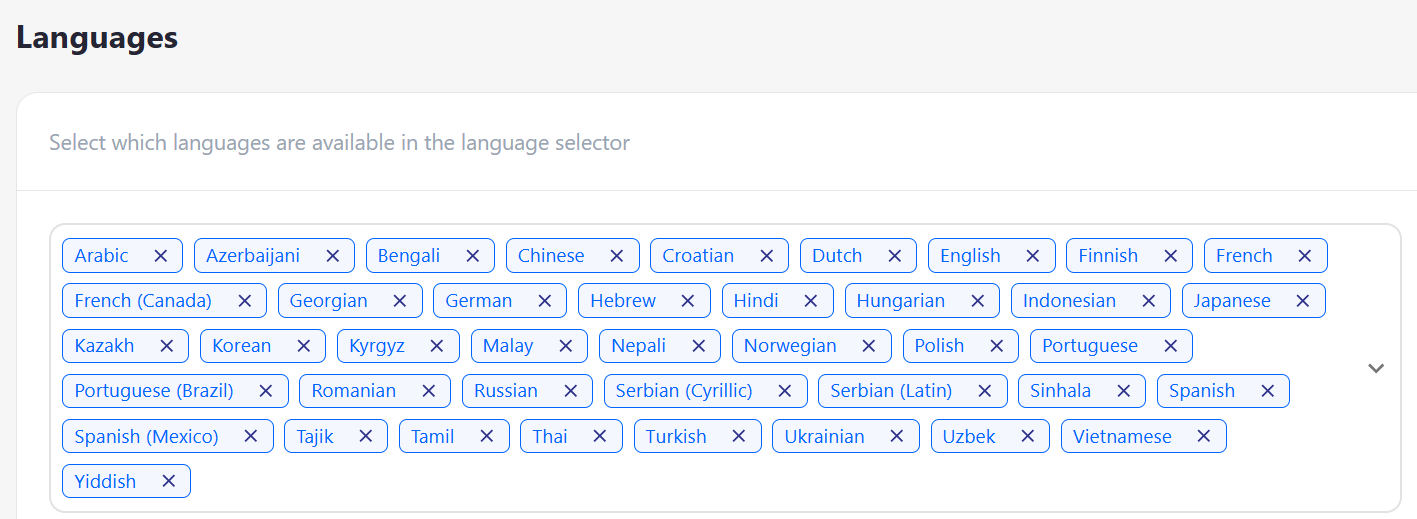
Select which languages are available in the language selector for the verification form.
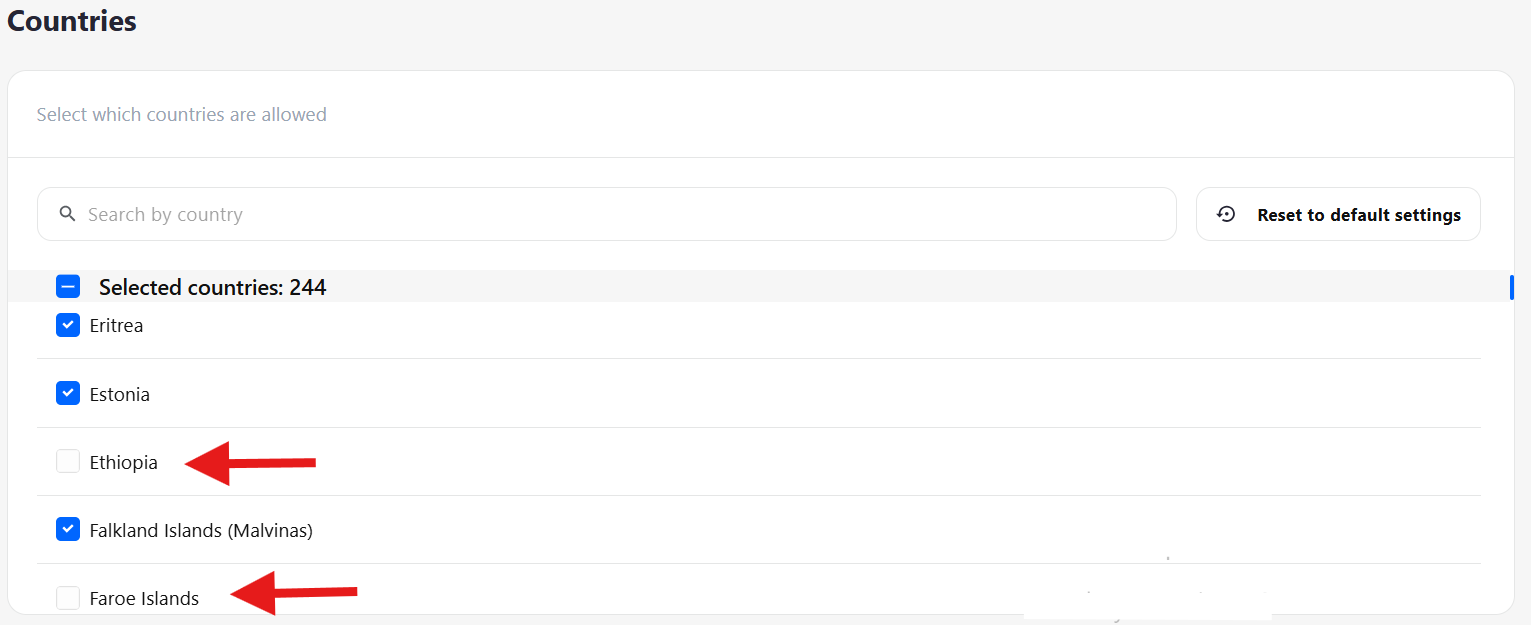
18.4 Countries
Add countries to the restricted list whose documents should be automatically declined by the system.
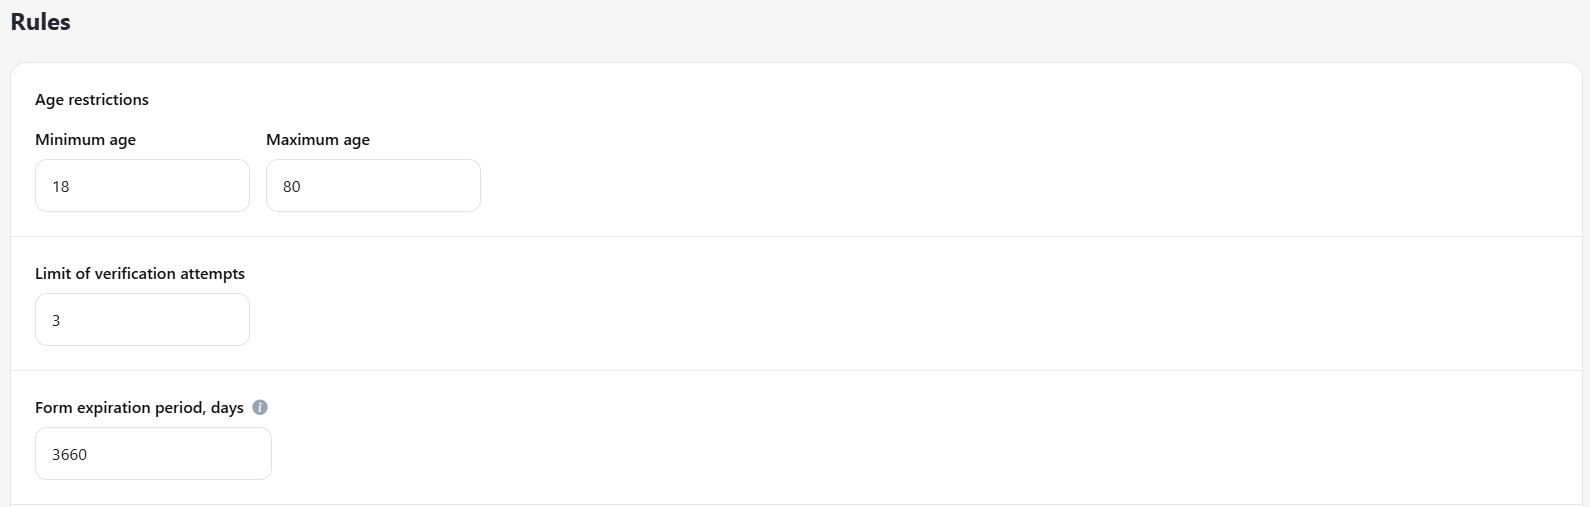
18.5 Rules
Set general verification parameters, including:
minimum and maximum applicant age
allowed number of verification attempts in case of decline
verification form validity period
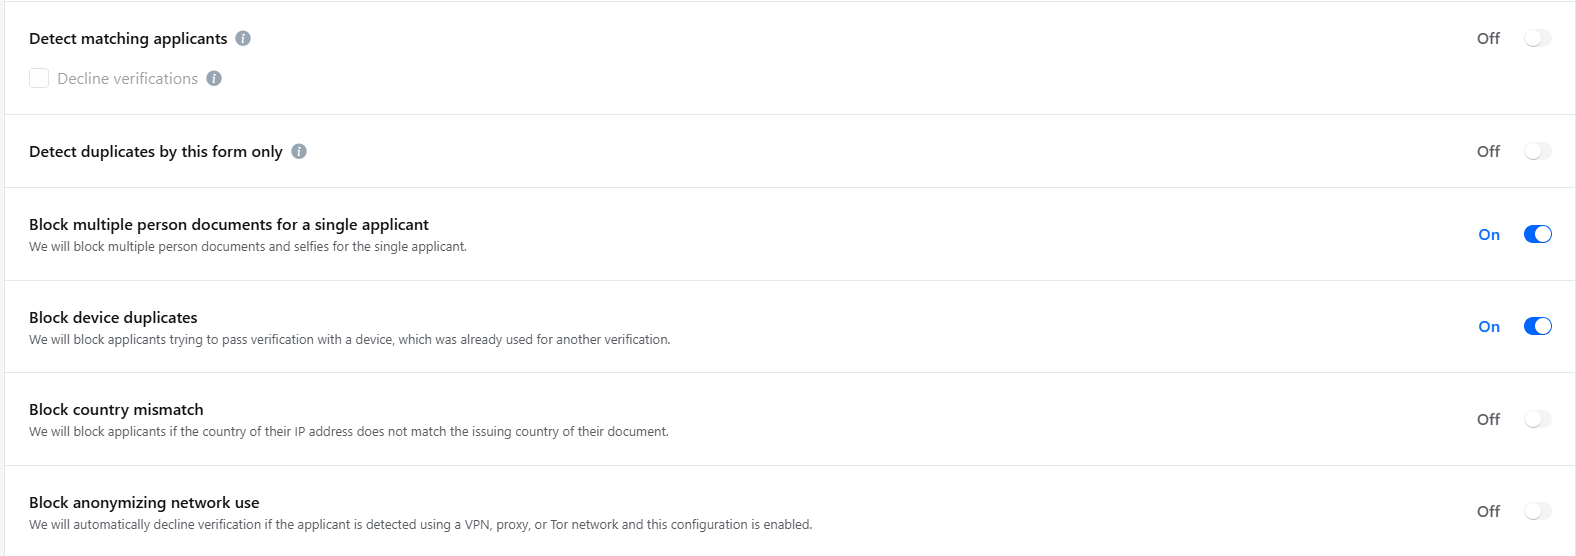
applicant blocking rules according to your company’s internal policy
Important: applicants verified under the same Applicant ID are not considered duplicates and are not automatically declined. Duplicates are applications created with different Applicant IDs.
18.6 Notifications
Enable or disable email notifications for applicants and customers.
Important: for applicants to receive notifications, the Profile option must be selected and the Enable input field enabled. Without this, notifications will not be sent.
Applicant email notification — the email is sent to the applicant after verification
Customer email notification — the email is sent to the customer after each verification, using the address provided during account registration

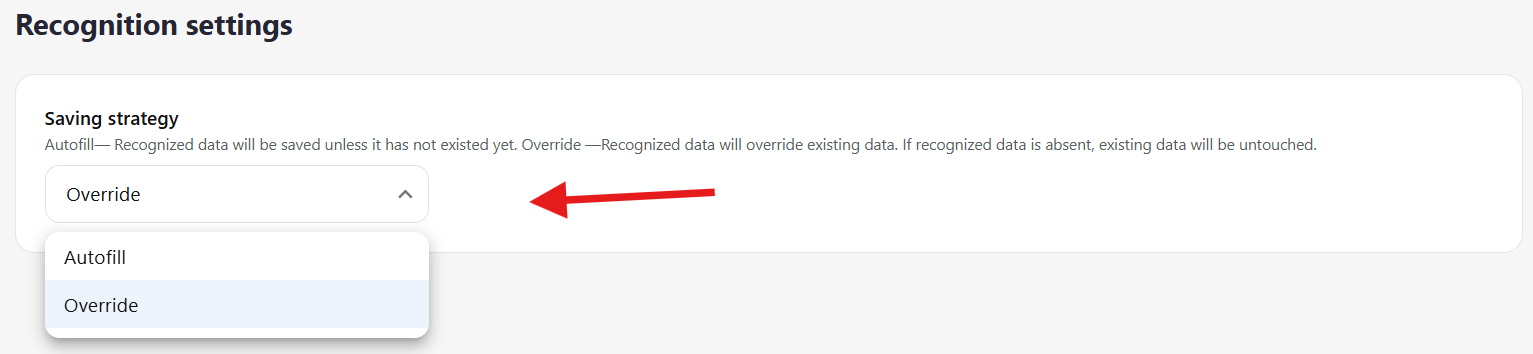
18.7 Recognition settings
**Autofill **— recognized data will be added automatically if the corresponding fields are empty. Existing data is not changed.
**Override **— recognized data will replace existing values. If new data is not recognized, current values remain unchanged.
Recommendation: use Override if your site has primary user registration. This is especially useful for applicants with double names or surnames, who may not enter them fully during registration — the system will capture and submit complete data from the document.
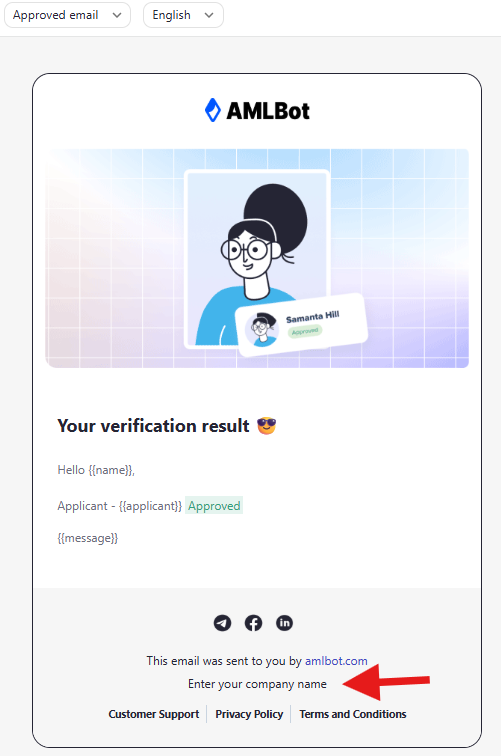
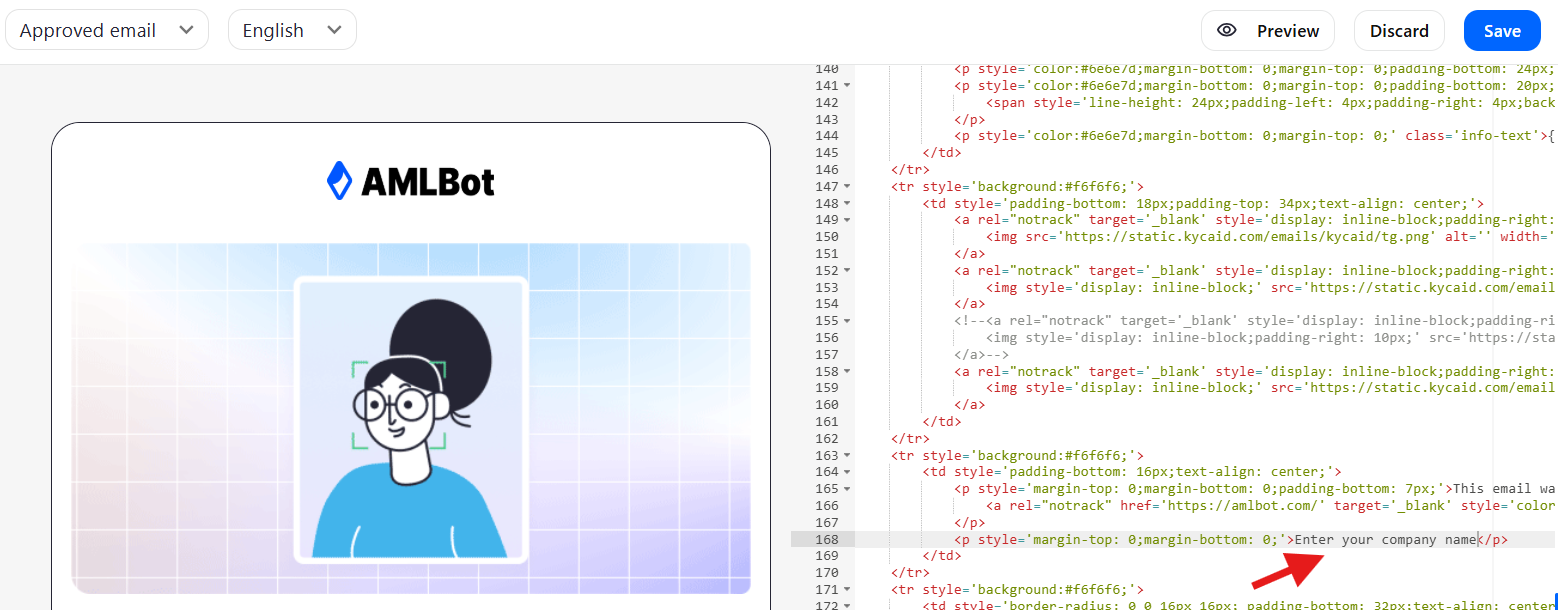
18.8 Email editor
You can customize the text and content of emails sent after verification, both for approved and declined verifications.
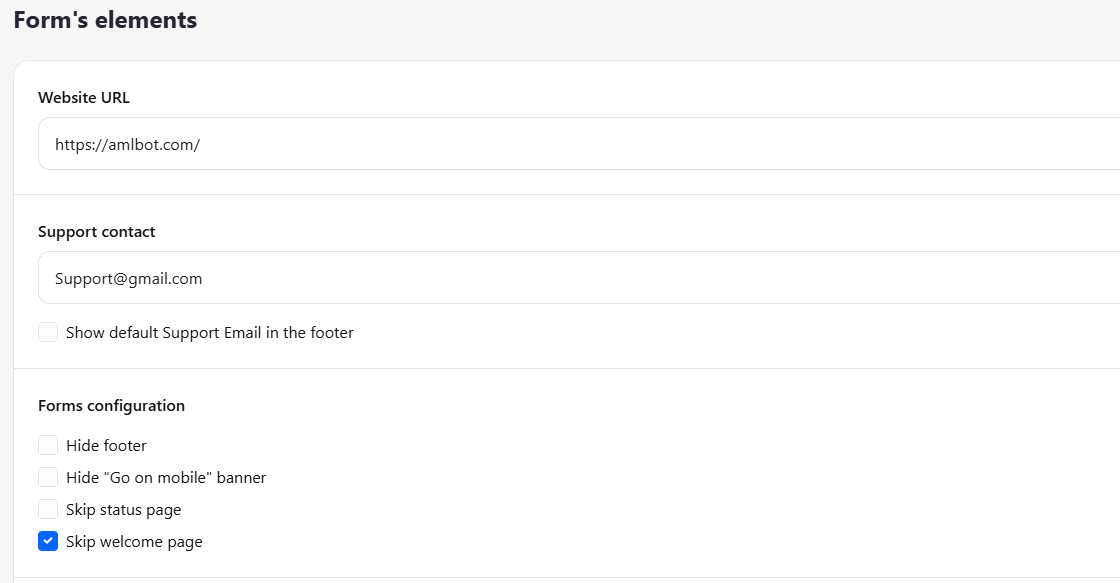
18.9 Form's elements
Form element settings allow flexible configuration of the verification form. You can:
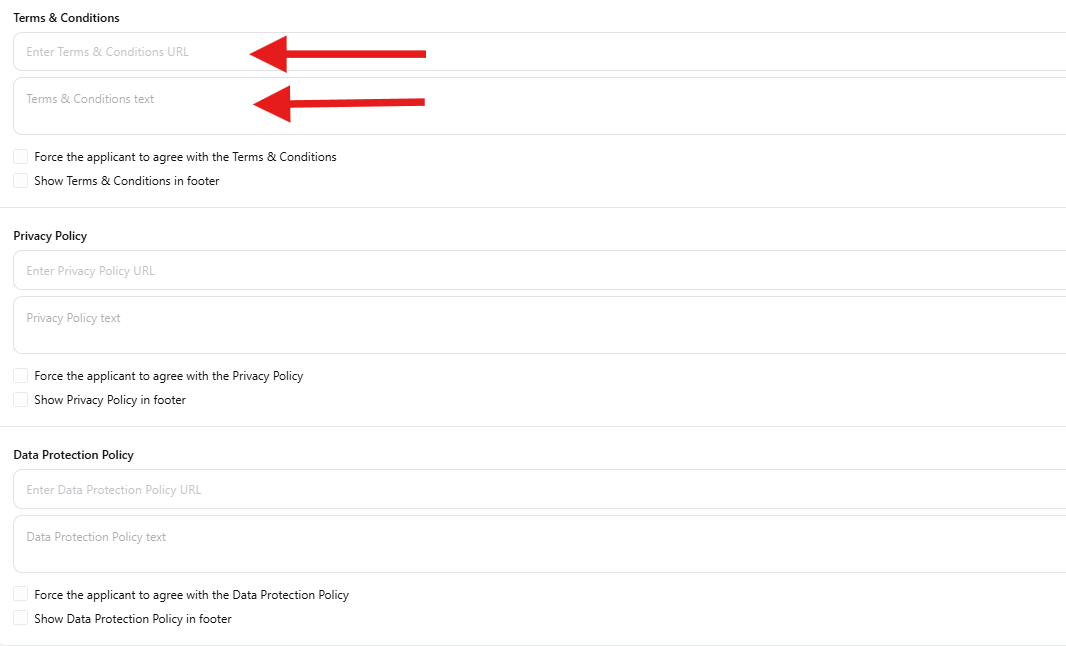
Add links to Terms & Conditions, Privacy Policy, and Data Protection Policy on the start page so users can review them
Enable an option to block progression to the next verification steps until the applicant agrees to these policies
Hide footer
Show default Support Email in the footer
Hide "Go on mobile" banner
Skip status page
Skip welcome page Legal and Privacy
To include information about legal and privacy requirements in your form, add references to the following documents:
Terms & Conditions
Privacy Policy
Data Protection Policy
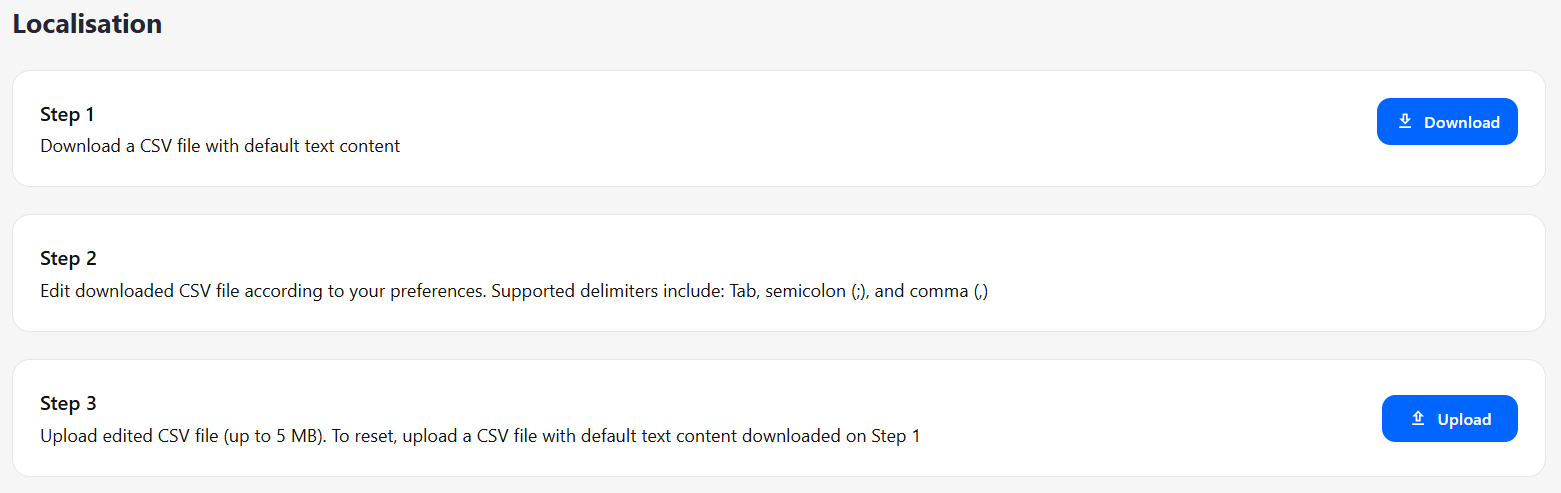
18.10 Localisation
Edit Text Throughout the Verification Process
This feature allows you to modify the text at all verification steps, with support for multiple languages. You can update any instructions or messages to fit your needs across the entire verification flow.

18.11 Verification steps
18.11.1 Manage Steps
With this option, you can add or remove verification steps in the form so that it fits your specific needs.
Select the verification option you need.
Add it to the form.
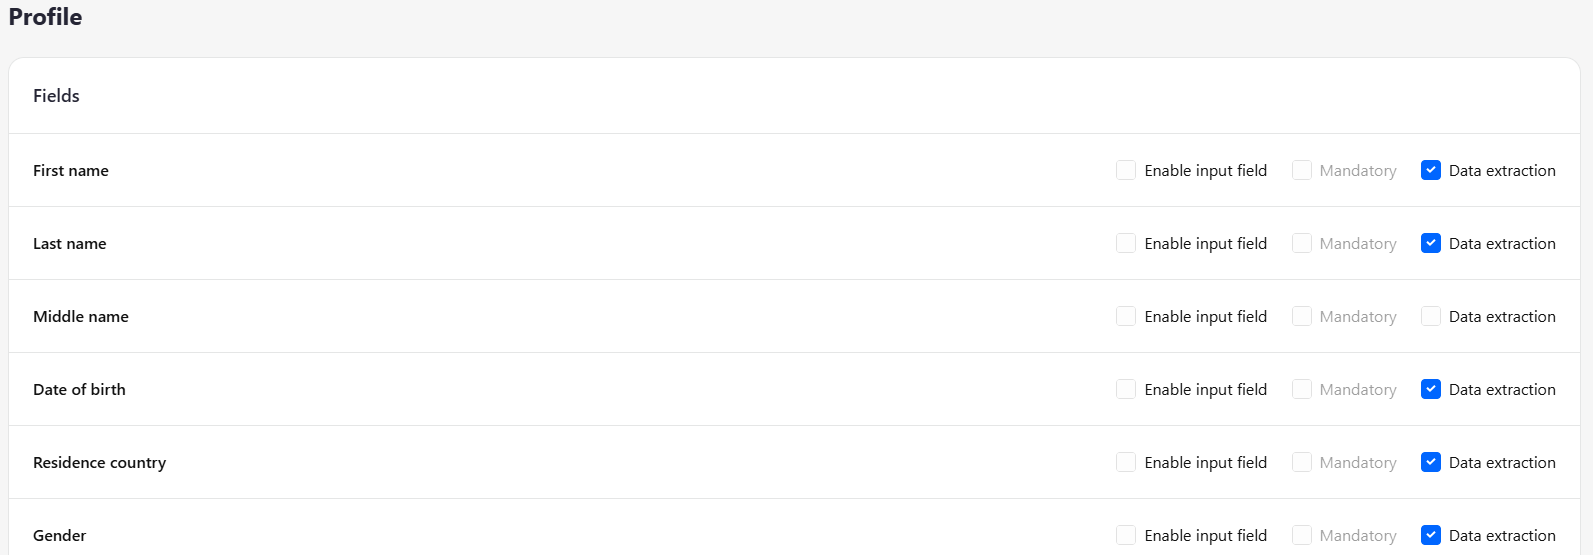
18.11.2 Profile
The user profile allows you to:
Extract mandatory fields from the document. Applicants can also enter data manually.
Note: Middle Name is missing in many documents. If Data Extraction is selected, the application may be declined if this information cannot be extracted, depending on the issuing country. It is recommended to leave this field empty — the system will automatically capture it from the document if available. Applicants can enter initials or full information manually during verification.
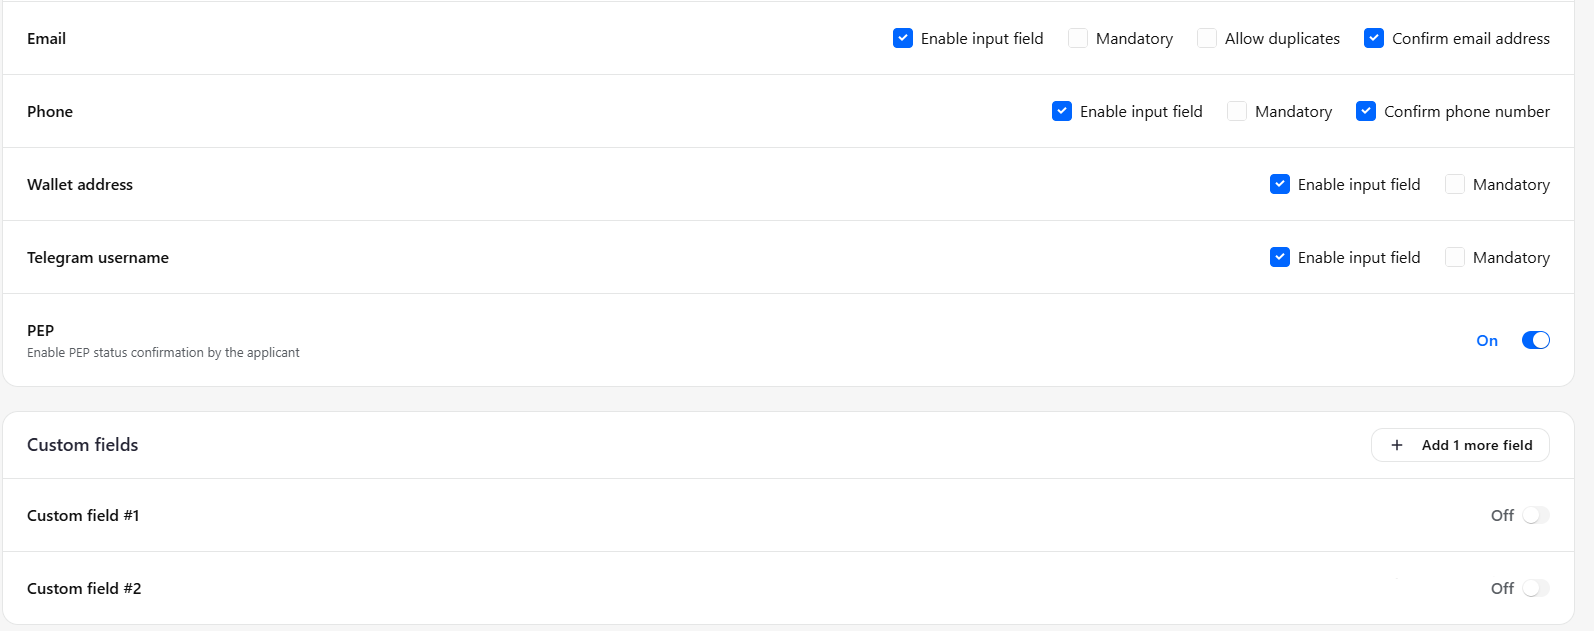
Collect additional data: Email, Phone, Wallet address, Telegram username, with the option to verify Email and Phone
Use custom fields to collect any other additional information.
18.11.3 Document
Document settings allow you to:
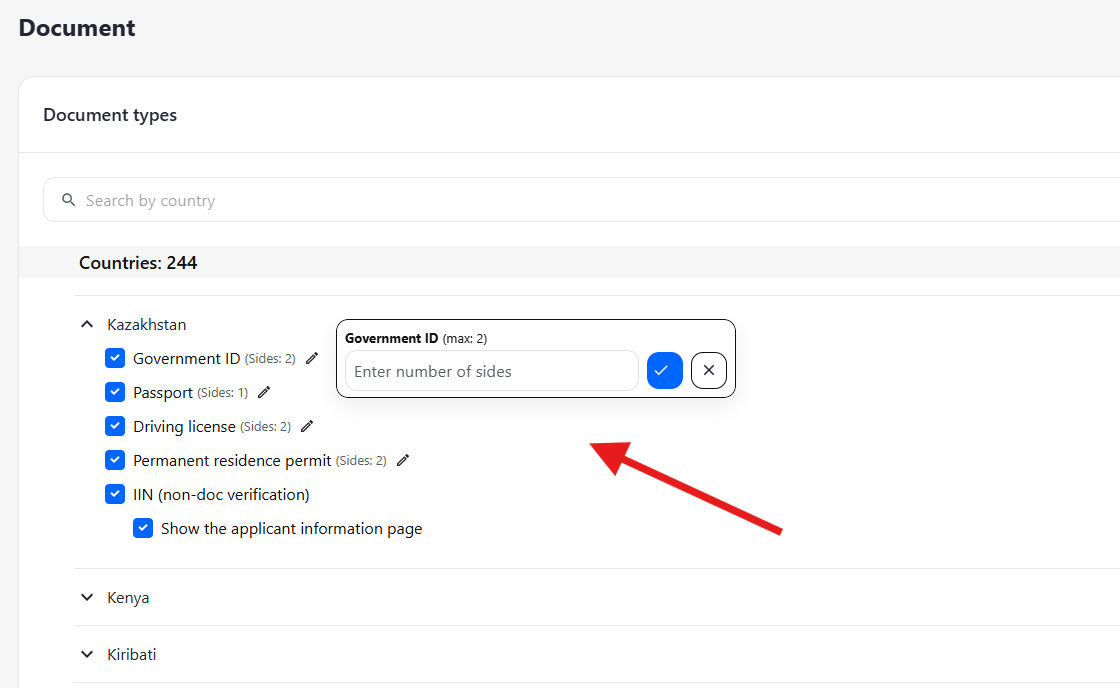
Select the document type and number of pages accepted for each country
Enable verification in some countries without physical documents, using government databases
Configure document submission method: file upload or live photo capture with process recording
Extract mandatory fields from documents
Note: Many documents from different countries may not include Expiry Date, Issue Date, Issuing Authority, or Additional Number. It is recommended to leave these fields empty and allow the system to automatically extract all available information
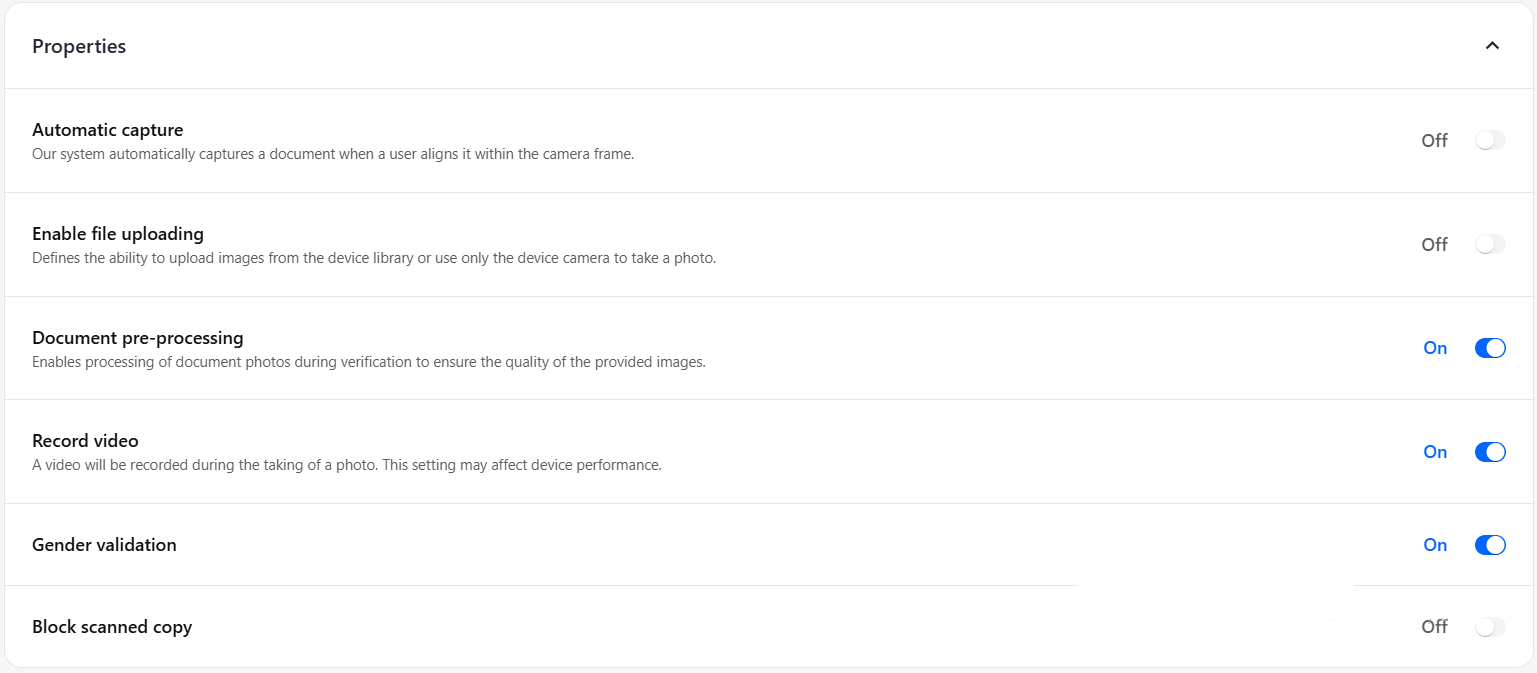
Automatically capture a document when the user aligns it within the camera frame
Allow uploading images from the device library or restrict to camera capture only
Recommendation: for real applicants, live photo capture with process recording is the most reliable
Process document photos during verification to ensure image quality
Record a video during photo capture (may affect device performance)
Enable Gender validation
Block scanned copies

18.11.4 Liveness
Liveness settings allow you to:
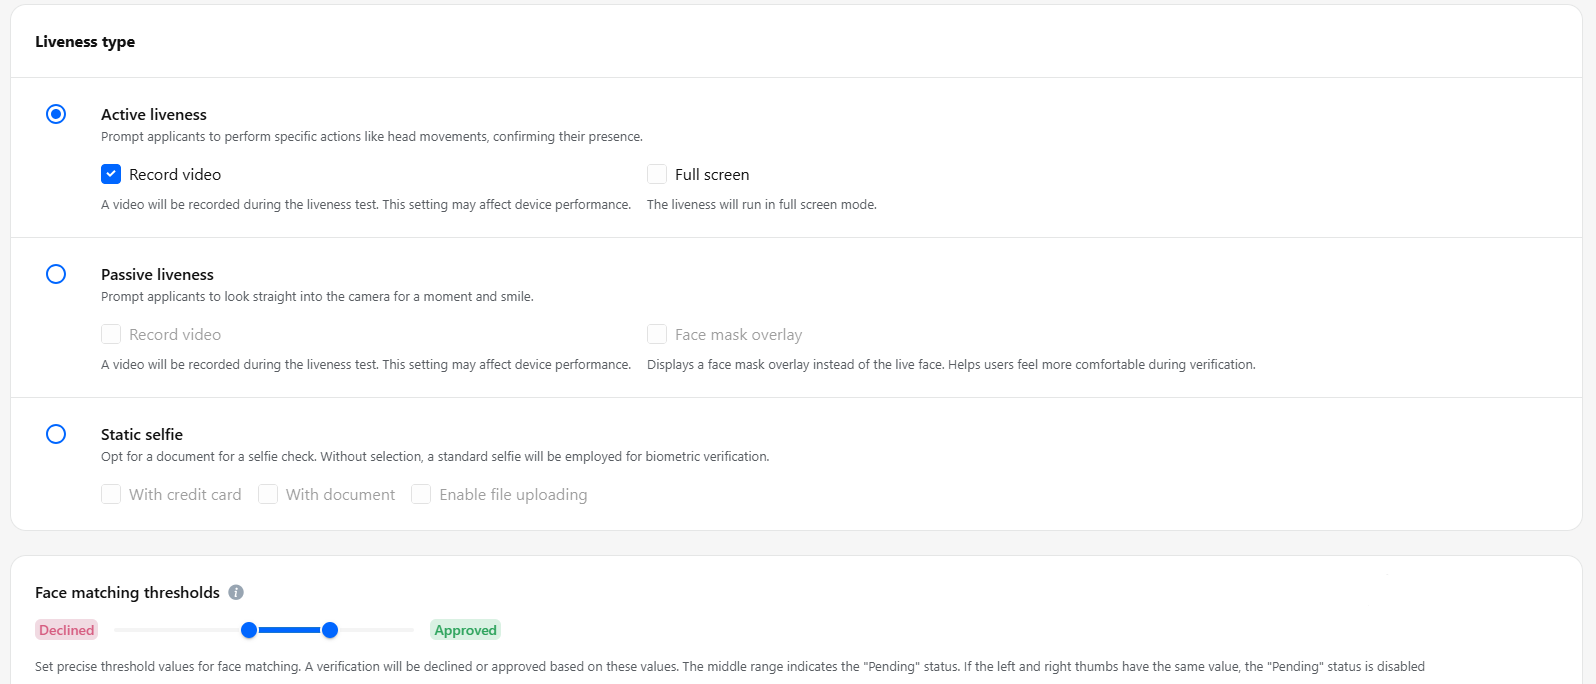
Face scanning mode
Choose the mode:
Active Liveness — allows video recording during the process
Passive Liveness — allows video recording during the process
Static Selfie — can be used with a document or credit card
Face matching thresholds
Set precise thresholds — verification will be approved or declined based on these values
Intermediate results are shown as “Pending” for additional review
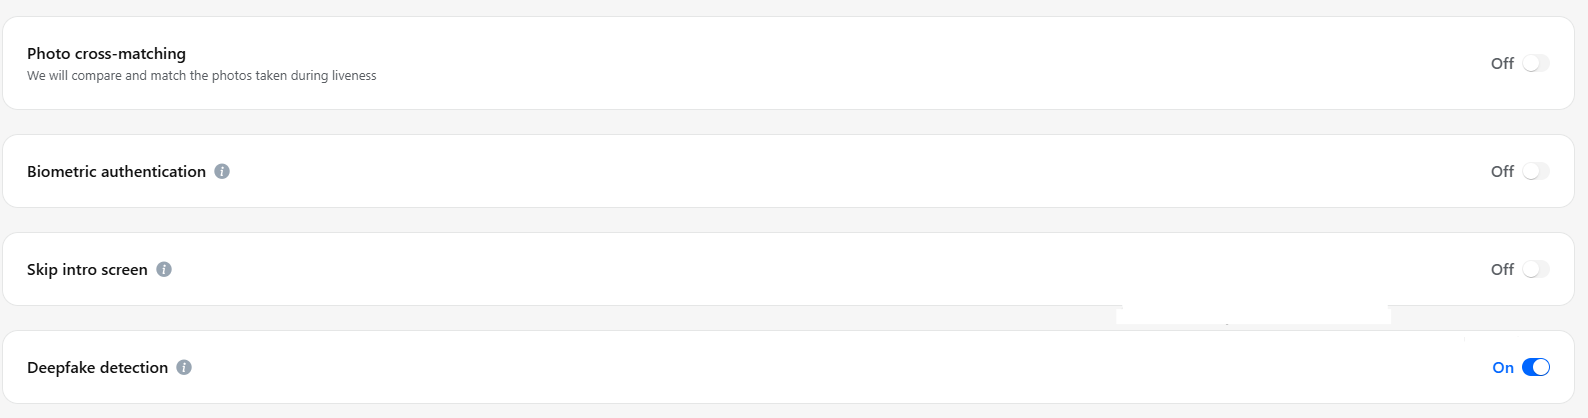
Photo cross-matching
We will compare and match the photos taken during liveness
Biometric authentication
Enable to use Liveness step for authentication
The minimum and maximum thresholds are locked in the Face matching thresholds to the same value to prevent a Pending status
Skip intro screen
Enable to start the Liveness step directly from the video stream
Used as part of the seamless authentication process
Deepfake detection
Our AI model analyses the video stream during liveness to detect deepfakes
Helps ensure the applicant is a real, live person
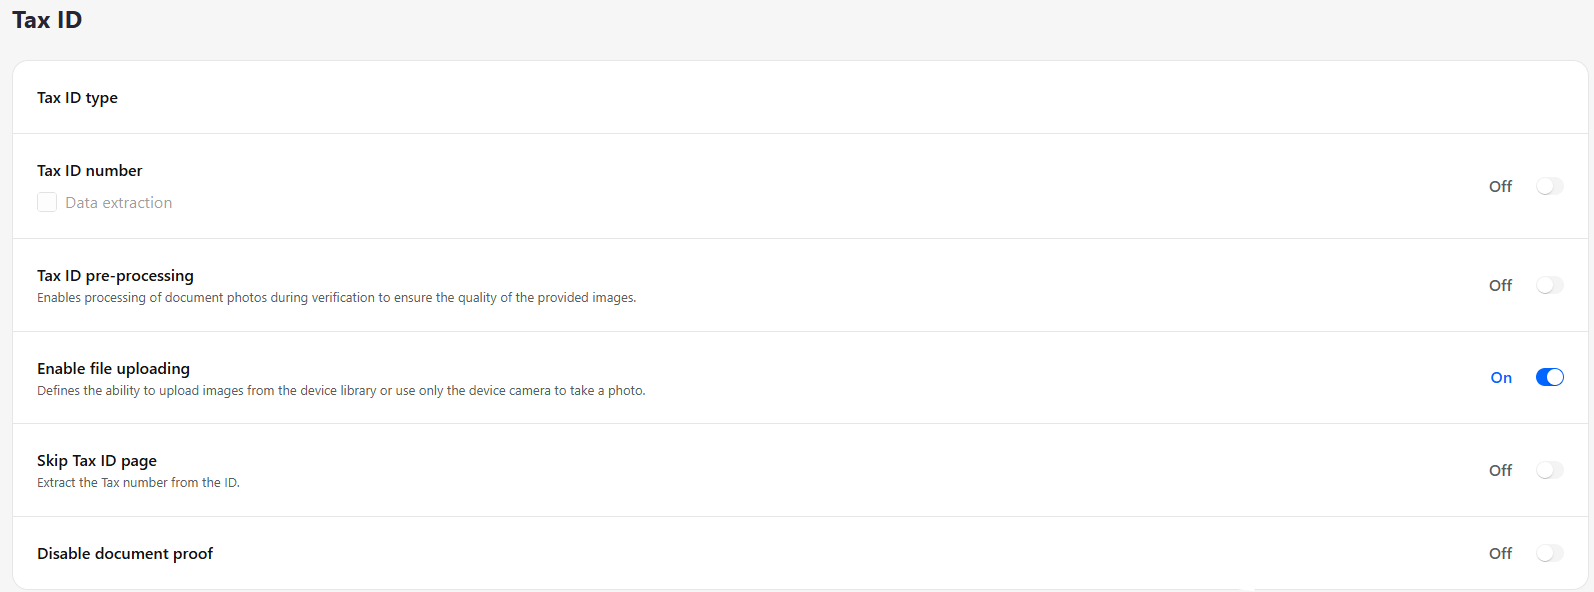
18.11.5 Tax ID
Tax ID number
Field to enter or display the Tax ID number
Data extraction
Automatically extract the Tax ID from the document
Tax ID pre-processing
Enables processing of document photos during verification to ensure the quality of the provided images
Enable file uploading
Allows uploading images from the device library or using only the device camera to take a photo
Skip Tax ID page
Extract the Tax number directly from the ID without showing the page Disable document proof
Option to disable the requirement for providing a document as proof
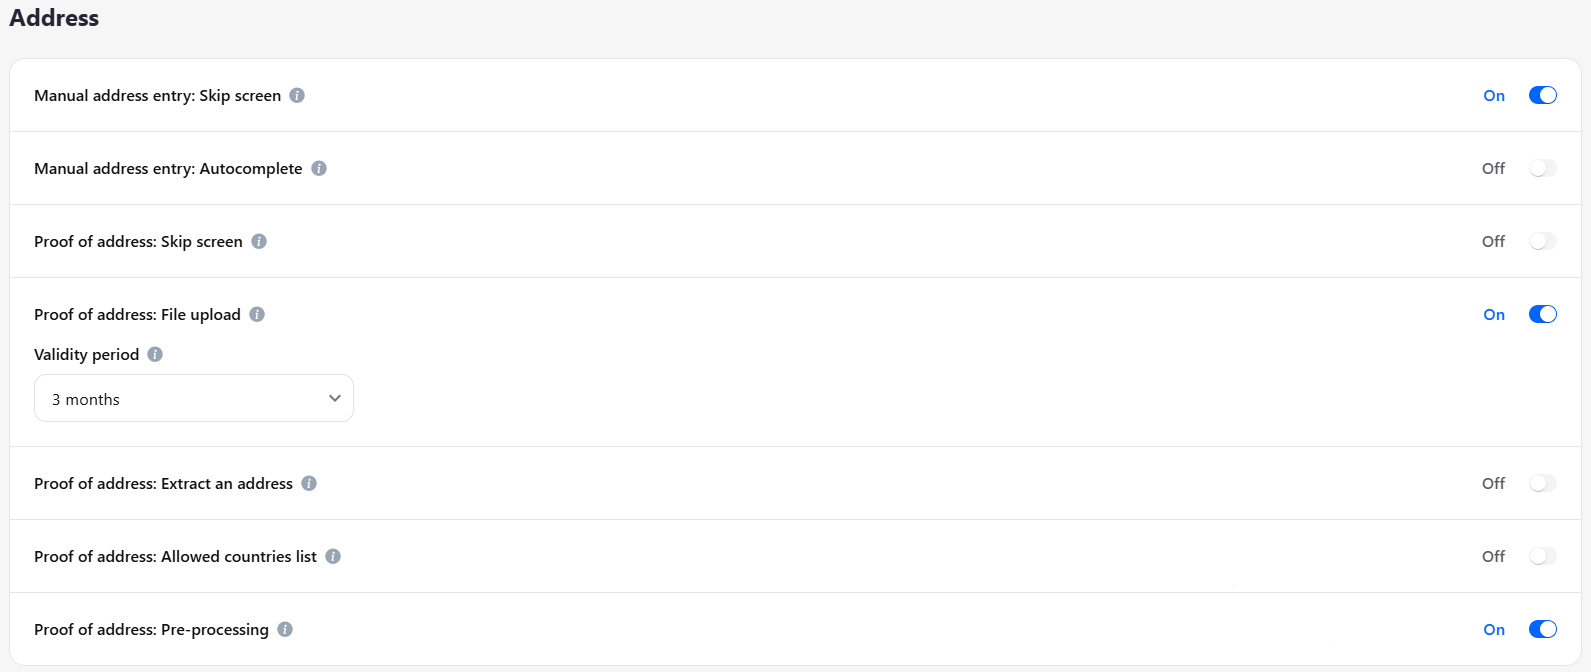
18.11.6 Address
Address verification settings allow you to:
Data entry method
Obtain the address from documents or allow manual entry by the applicant
Document validity period
Set the document’s validity period from 1 month up to unlimited
Allowed countries
Select which countries are accepted for address verification
Autofill
Use system autofill to populate address fields automatically — recommended for faster and more accurate verification
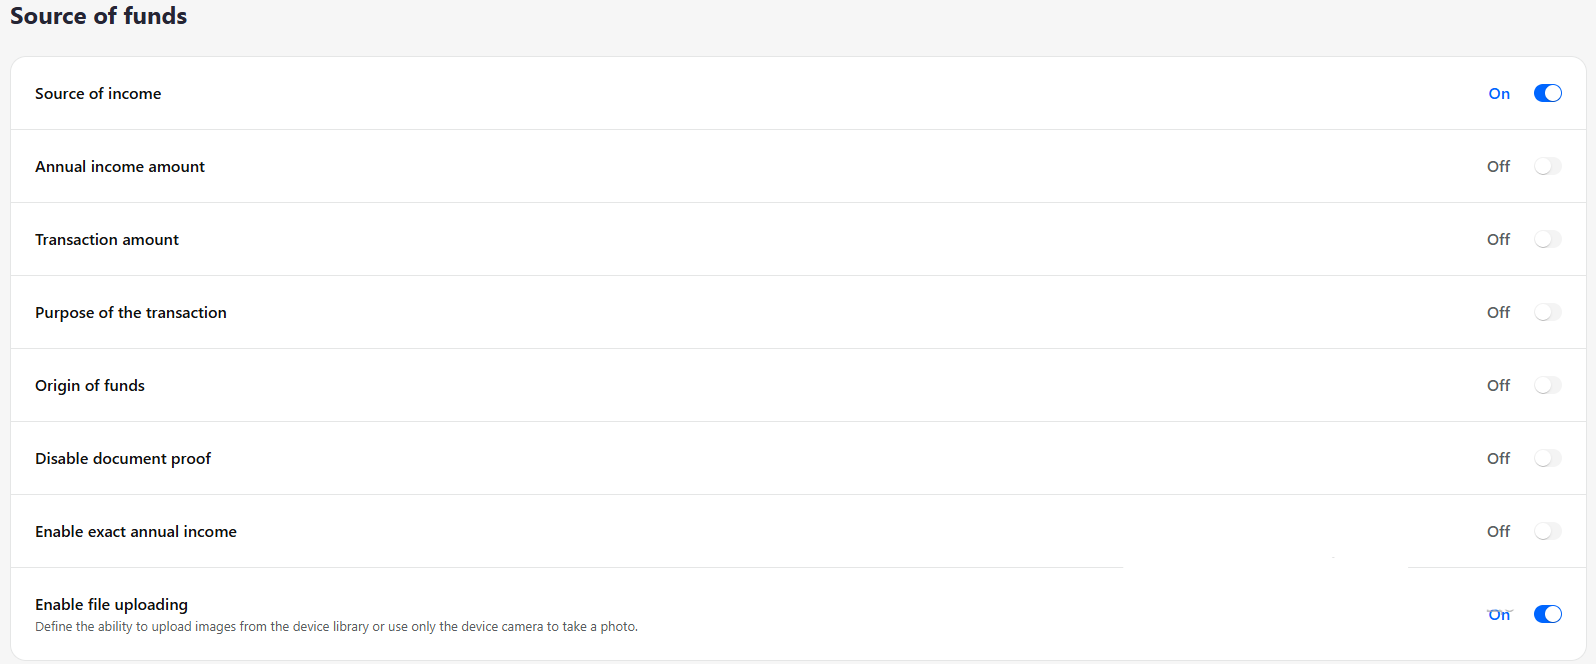
18.11.7 Source of funds
The Source of Funds settings allow you to configure criteria for applicants to provide information about the sources and origin of their funds. You can customize this option according to your company policies and requirements to obtain accurate and structured data from applicants.
Settings include:
Source of income — select the applicant’s sources of income
Annual income amount — collect the applicant’s annual income
Transaction amount — record the amount of a specific transaction
Purpose of the transaction — define the purpose of the transaction
Origin of funds — detail the origin of the funds
Disable document proof — option to disable providing a supporting document
Enable exact annual income — require the exact annual income amount
Enable file uploading — allow uploading documents from the device library or using only the device camera
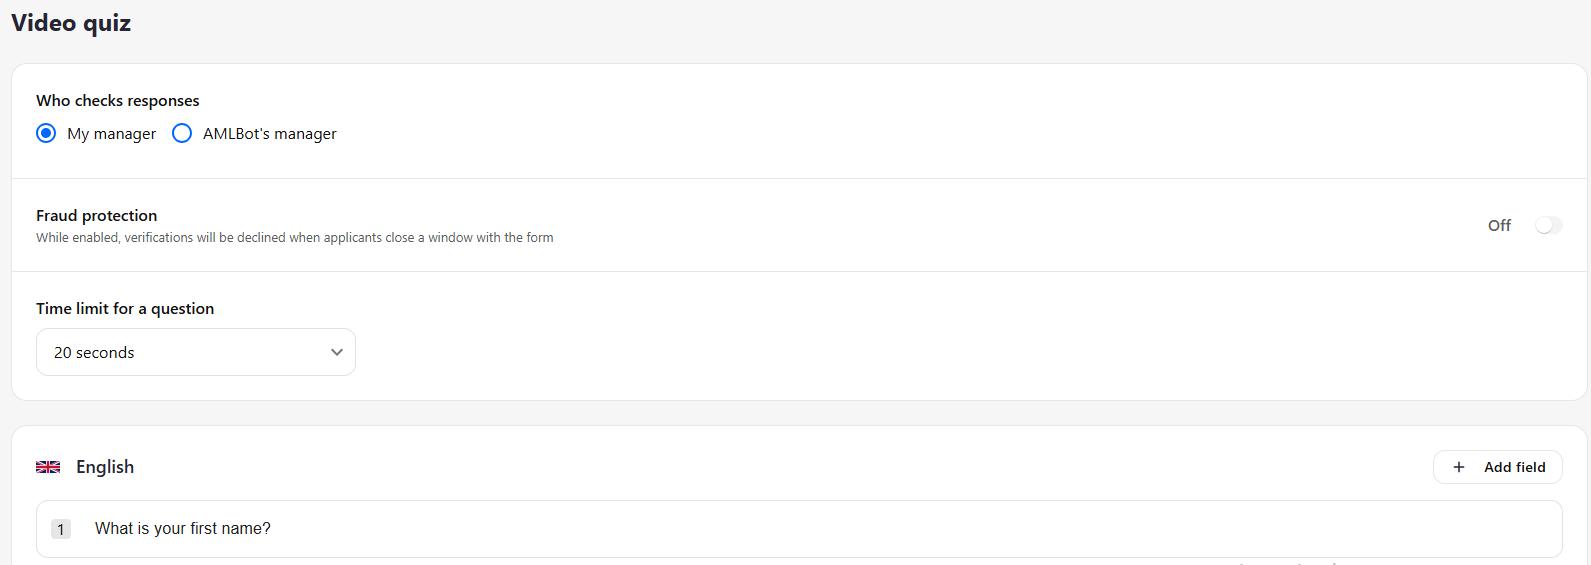
18.11.8 Video quiz
Video questionnaire settings allow you to set questions, select the number of questions, and define the response time from 10 to 60 seconds for each language selected in the form.
Verification can be performed by:
the AMLBot manager
your manager
This provides flexibility in choosing the verification method according to your internal processes.
18.11.9 Live video
Video interviews with applicants allow you to record their responses.
The interview can be conducted by the AMLBot manager or your company’s own manager.
After the interview, the video will be recorded and available in the applicant’s profile.
Using your own manager is recommended to collect answers to your organization’s questions directly from the applicant.
The interview takes place after all configured verification options have been completed by the system.

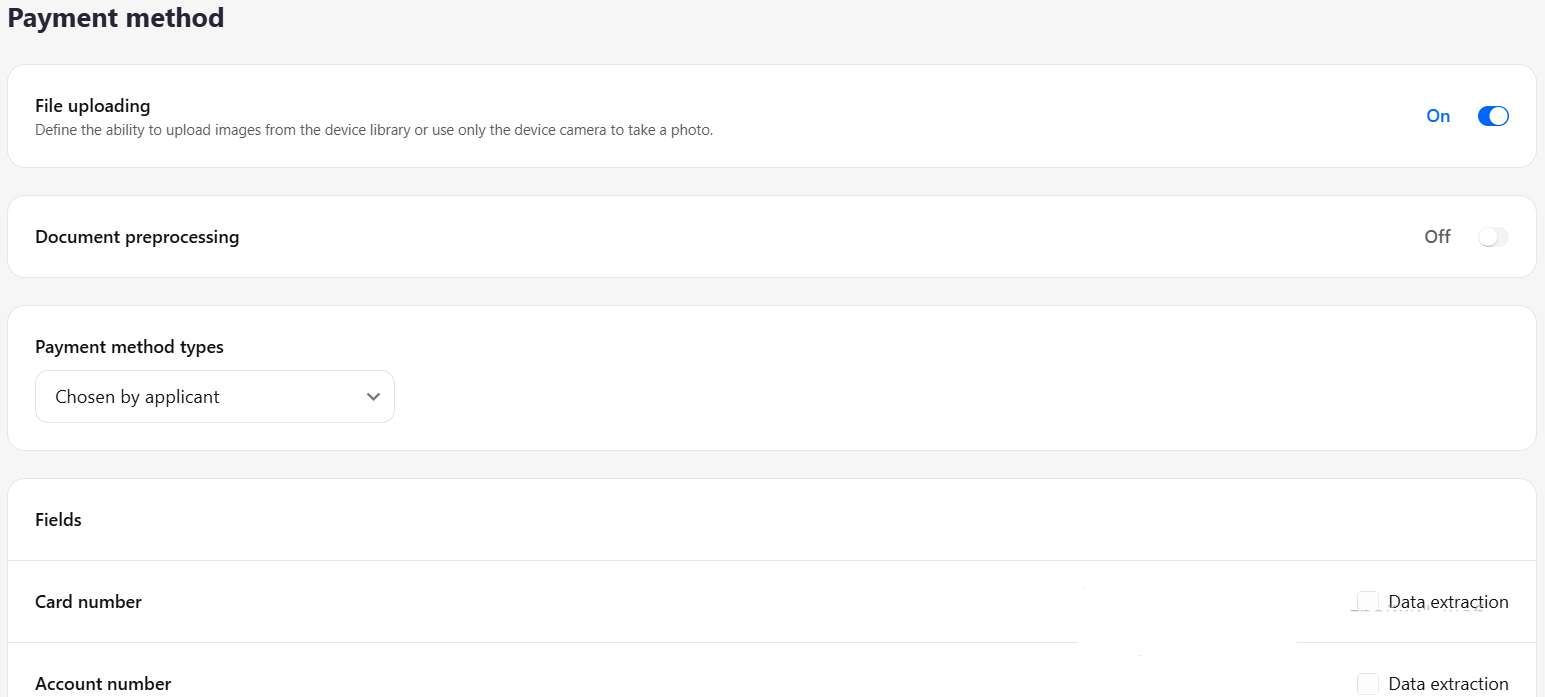
18.11.10 Payment method
The Payment Method settings allow you to:
Collect a bank account statement or a credit card photo from the applicant
Configure which document category will be offered to the applicant.
18.11.11 Database screening
The Database Screening option during verification allows you to:
Check applicants for sanctions list matches
Identify PEP (Politically Exposed Person) status
Use your own uploaded databases as well as the databases available in the system

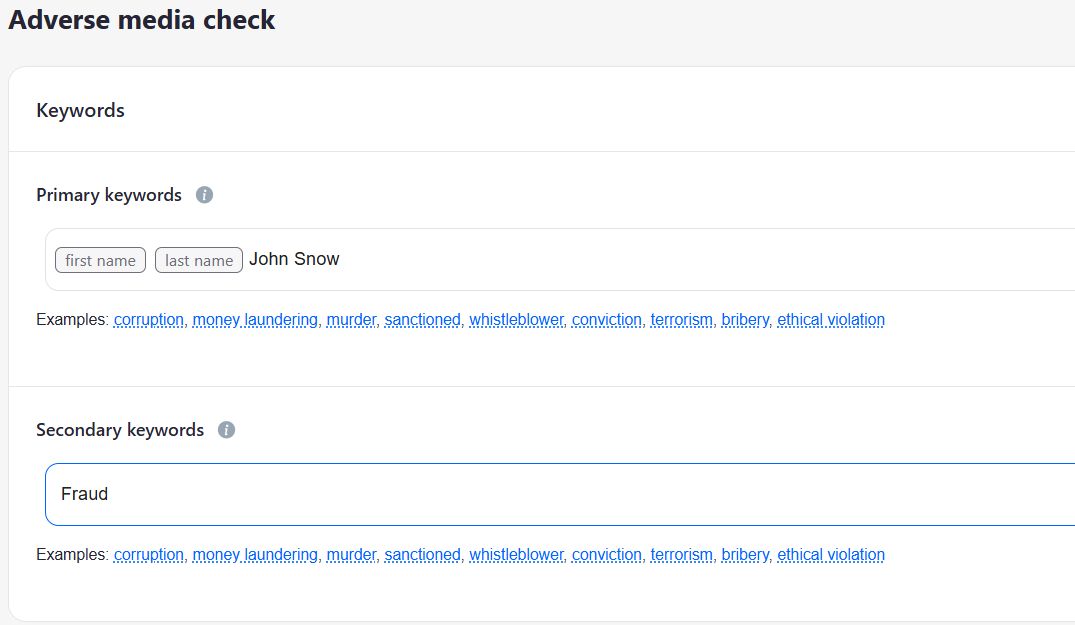
18.11.12 Adverse media check
The Adverse Media Check option allows you to:
Screen applicants for negative or compromising publications in media and open sources
Assess reputational and risk factors
Configure keyword-based searches to detect relevant mentions in publications
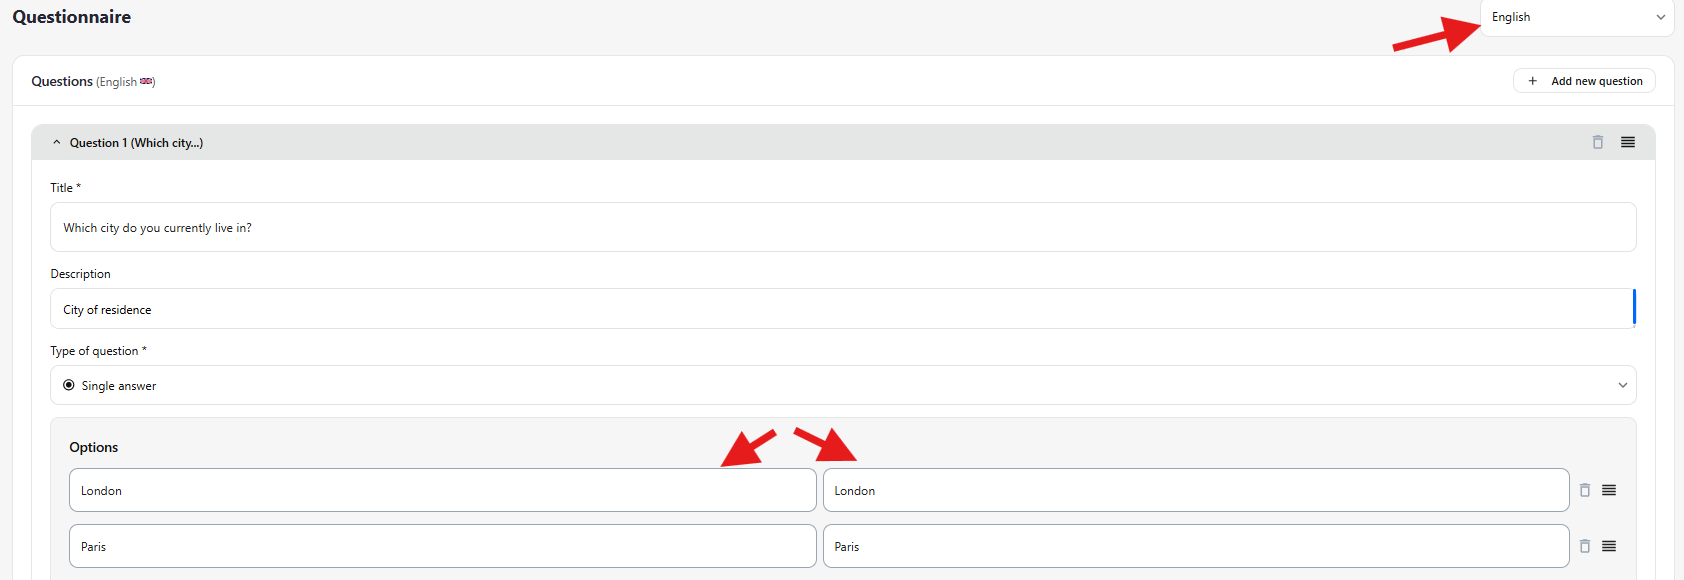
18.11.13 Questionnaire
The Questionnaire option allows you to collect responses from applicants through a survey.
Configure questions according to your needs and the number of questions (current maximum — 10)
Allows multiple-choice answers
Important: when using answer options, responses must be translated into all selected languages in the form, in the second column for the chosen country. The first column must contain the question in English.

18.11.14 US eIDV
US eIDV (Automated Identity Verification for US Citizens)
If you want to verify the identity of US citizens during the KYC process, you can use US eIDV — an automated service that confirms identity through official tax, credit, and government databases.
This allows you to:
quickly verify identity;
reduce the risk of fraud;
perform verification without requiring additional documents from the client.
Key points:
Enables fast online verification
Checks personal data: name, date of birth, address, SSN, and other government records
Helps identify high-risk or fraudulent users before providing services
18.12 Company (KYB)
As part of a company verification, a KYB (Know Your Business) check is conducted based on documents uploaded by the applicant.
The applicant should provide documents confirming company registration, legal address, authorized persons, and company ownership. This may include:
Certificate of Incorporation, Certificate of Good Standing/Incumbency, M&AA
Register of Directors, Resolution to appoint as Director, etc.
Share Certificate, Trust Deed/Declaration, Register of Shareholders/Share Ledger
We process the uploaded documents and check whether they have been edited using software.
We verify:
the jurisdiction of company incorporation and type of business activity according to client rules/policies
whether the company is active according to Corporate Registry information (if publicly available in the country of incorporation)
registered address of the company
authorized persons and their identification documents
company beneficiaries and their identification documents
The company, its authorized persons, and beneficiaries are checked through sanction lists, PEP databases, and blacklists.
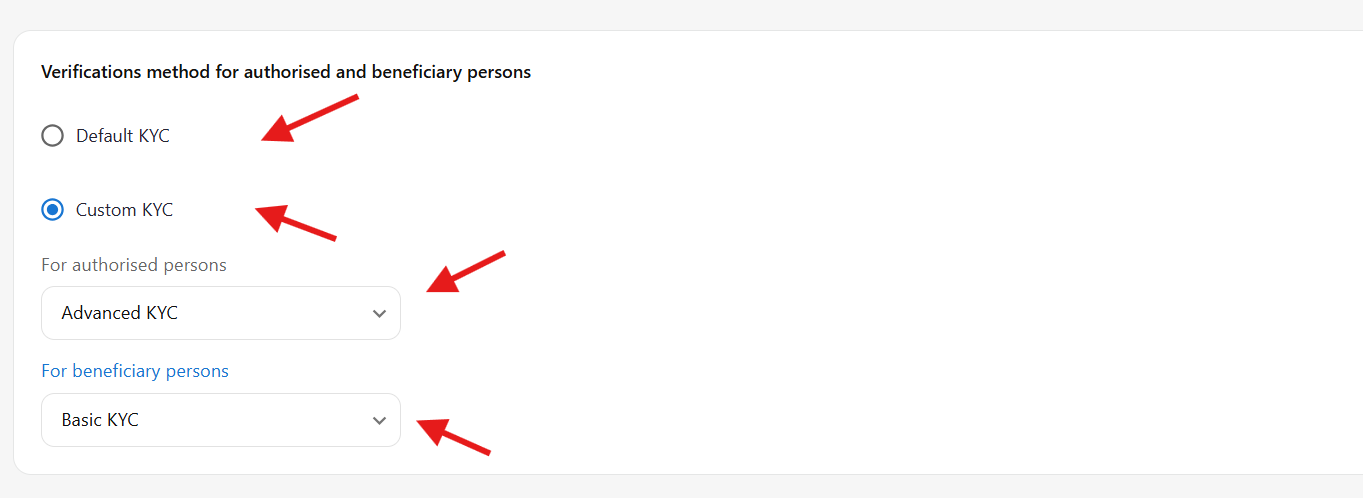
Additionally, you can verify authorized persons and beneficiaries using extra parameters (selected from the list) or by default.
In addition to the company verification, you can add a Questionnaire.